The delivery checklist: grip, stance, step, release
Four things happen between picking up the bowl and letting it go. Get them in the right order and most of your other faults quietly disappear.
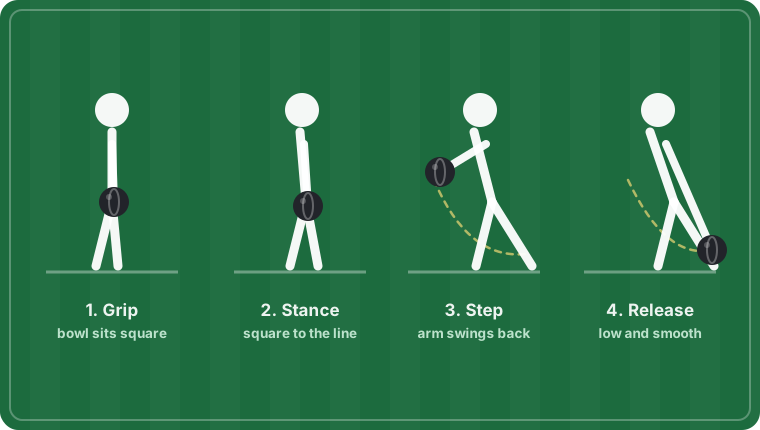
There is no correct lawn bowls delivery. People win pennants standing almost upright and people win pennants from a full crouch. What they have in common isn't a shape — it's that they do the same thing every time.
So this isn't a "correct technique" article. It's a checklist of four stages, the faults that live in each, and how to tell which one is yours. Work through them in order, because a fault early in the chain creates fake faults later on. Fix your grip and half your "release problems" evaporate.
Stage 1: Grip
The grip decides whether the bowl leaves your hand cleanly and on the axis you intended. Get it wrong and nothing downstream can save you.
Two grips cover almost everyone:
The cradle (or claw). The bowl sits back in the palm, fingers spread underneath. Secure, forgiving, easy to hold when you're tired or the bowl is slightly too big. It costs you a little feel on very fast greens.
The finger grip (or claw proper). The bowl sits forward on the fingers, palm barely touching. More feel, more control on quick surfaces, more demanding — the bowl has to be the right size for your hand or you'll be squeezing to keep hold of it.
Whichever you use, the same three things must be true:
- The running surface is vertical at release. The grip lines on the bowl should sit flat in your hand, not tilted. A tilted bowl wobbles, and a wobbling bowl loses speed unpredictably — that's the bowl that mysteriously finishes short.
- Your thumb isn't doing the work. A thumb clamped high on the side of the bowl is compensating for a bowl that's too big. It also drags the bowl off-axis at release.
- You're not squeezing. If your forearm is tight before you've moved, the bowl is too big or too heavy for you. See choosing your first set of bowls.
The fault this stage causes: wobble. If your bowl rocks visibly for the first few metres, stop working on line — you're solving the wrong problem.
Stage 2: Stance
The stance's only job is to put you in balance, aimed at the target, ready to move forward without adjusting anything.
The checklist, whatever height you stand at:
- Feet on the mat, square to your aiming line. Not square to the ditch, not square to the jack — to your line, which on a bending bowl is well off to one side. This is the single most common stance error and the reason bowlers are narrow on one hand only.
- Weight slightly forward. On the balls of the feet, not the heels. From the heels your first move has to be a recovery.
- The bowl held in front of the body, over the delivery line, not out to the side and not tucked in against your hip.
- Eyes on the aiming marker, not on the jack. Pick a fixed point on the bank and stay with it — see reading a green.
The fault this stage causes: hand-specific narrowness. If you're narrow on the forehand and fine on the backhand, your shoulders are almost certainly not square to the forehand line.
Stage 3: Step
One step, down the line, at a length you can repeat.
Most club bowlers have one of two problems here, and they're opposites.
Too short a step — the delivery becomes all arm. The bowl gets pushed rather than swung, weight control goes with it, and you'll find you're consistently short at longer jack lengths.
Too long a step — you arrive at the end of the step still moving, the body is falling forward, and the release gets rushed to catch up. This is the classic cause of the bowl being dropped hard onto the green.
The test is simple: at the end of your step, could you hold that position for two seconds? If you'd topple, the step is too long for your balance.
The second test: does the stepping foot land on your aiming line? Lay a string or a chalk line down the line and step along it without a bowl a dozen times. A foot landing across the line pulls your whole delivery narrow, which is cause three of the narrow bowl.
Stage 4: Release
Everything so far exists to make this bit boring. A good release should feel like nothing much happened.
What good looks like:
- The bowl is placed onto the green, not dropped onto it. Your hand travels low and forward, and the bowl leaves it close to the surface. A dropped bowl bounces, and a bounced bowl is a lottery.
- The arm swings under the shoulder, like a pendulum. No pushing across the chest, no scooping upward.
- The hand finishes pointing at the aiming marker. If your follow-through finishes across your body, the bowl went out narrow whether it felt like it or not.
- The release happens at the bottom of the swing, not on the way up.
The two named faults worth knowing:
The drop-and-push. You release the bowl slightly early and high, then shove it forward with the hand to compensate. Symptoms: inconsistent weight for no apparent reason, and a bowl that seems to "run on" some ends and not others. Fix by extending the follow-through deliberately — aim to have your fingers brush the green after the bowl has gone.
The lift. The hand rises through the release, imparting a tiny amount of backspin and lift. The bowl lands a foot or two down the green. Symptoms: a distinct thud, and bowls that finish short on heavy greens where the extra bounce eats speed.
Running the checklist
Don't try to fix four things at once — you'll get worse, get discouraged, and go back to what you were doing.
Take one stage per practice session, in order. A fortnight of that, in twenty-minute blocks, is worth more than a season of vaguely bowling and hoping.
And run the diagnosis from the top of the chain down. A wobbling bowl caused by a bad grip will look exactly like a release fault. A narrow bowl caused by an open stance will look exactly like a line problem. The order isn't decorative — it's the whole point.
The bit you can't do alone
Three of these four stages are invisible from inside your own delivery. You cannot see whether your shoulders are square. You cannot feel a stepping foot two inches across the line. Almost nobody can tell whether they're releasing at the bottom of the swing or slightly after it.
Get a clubmate to film you from directly behind the mat, on both hands, three bowls each, then again from the side at bowl height. Watch it at quarter speed. The first viewing is uncomfortable for everyone. The second is where the improvement comes from.
The Monday drill
One short email a week: a drill to try, and the fix that solved someone's problem on the green.